Loaf cakes

June 23, 2025

Cannabis Infused Marble Cake

Cannabis Infused Chocolate Hazelnut Marble Cake

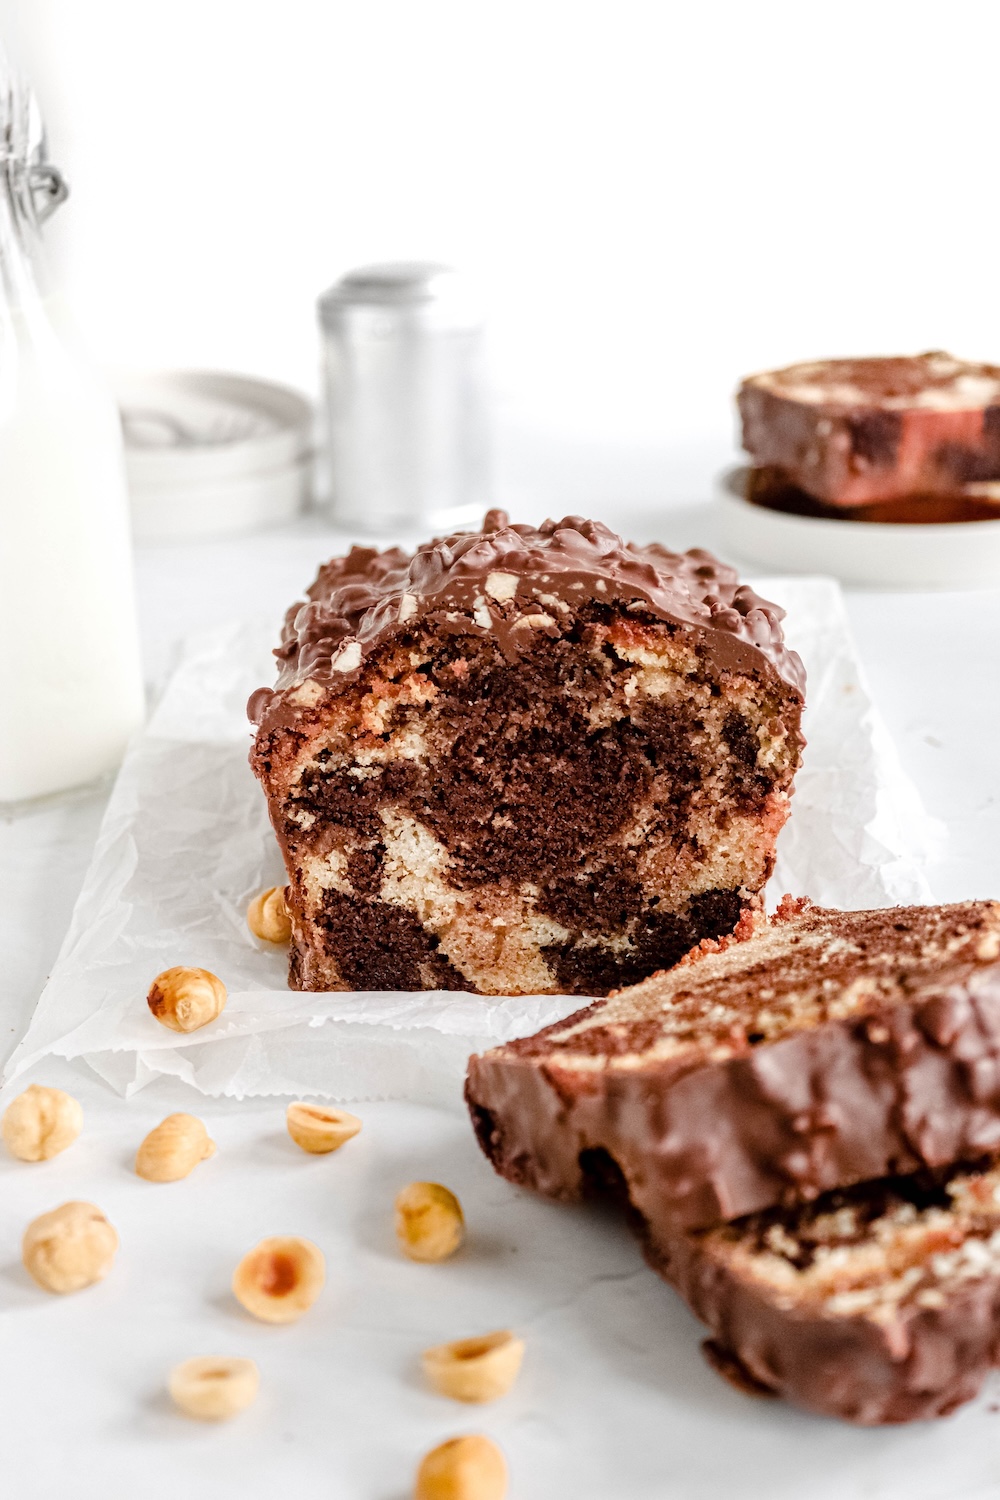
This beauty doesn’t only look good but tastes amazing too AND has a hint of 🌱. Where chocolatey goodness meets buttery vanilla, all finished off with a delicious crunchy hazelnut chocolate coating (which is totally optional but recommended). 

The best part about this cake is that it looks incredibly fancy but is darn easy to make. It takes you just a few minutes to whip up the batter and then you can leave the rest of the work up to the oven. Sounds like a dream right! 


What is Chocolate Hazelnut Marble Cake?

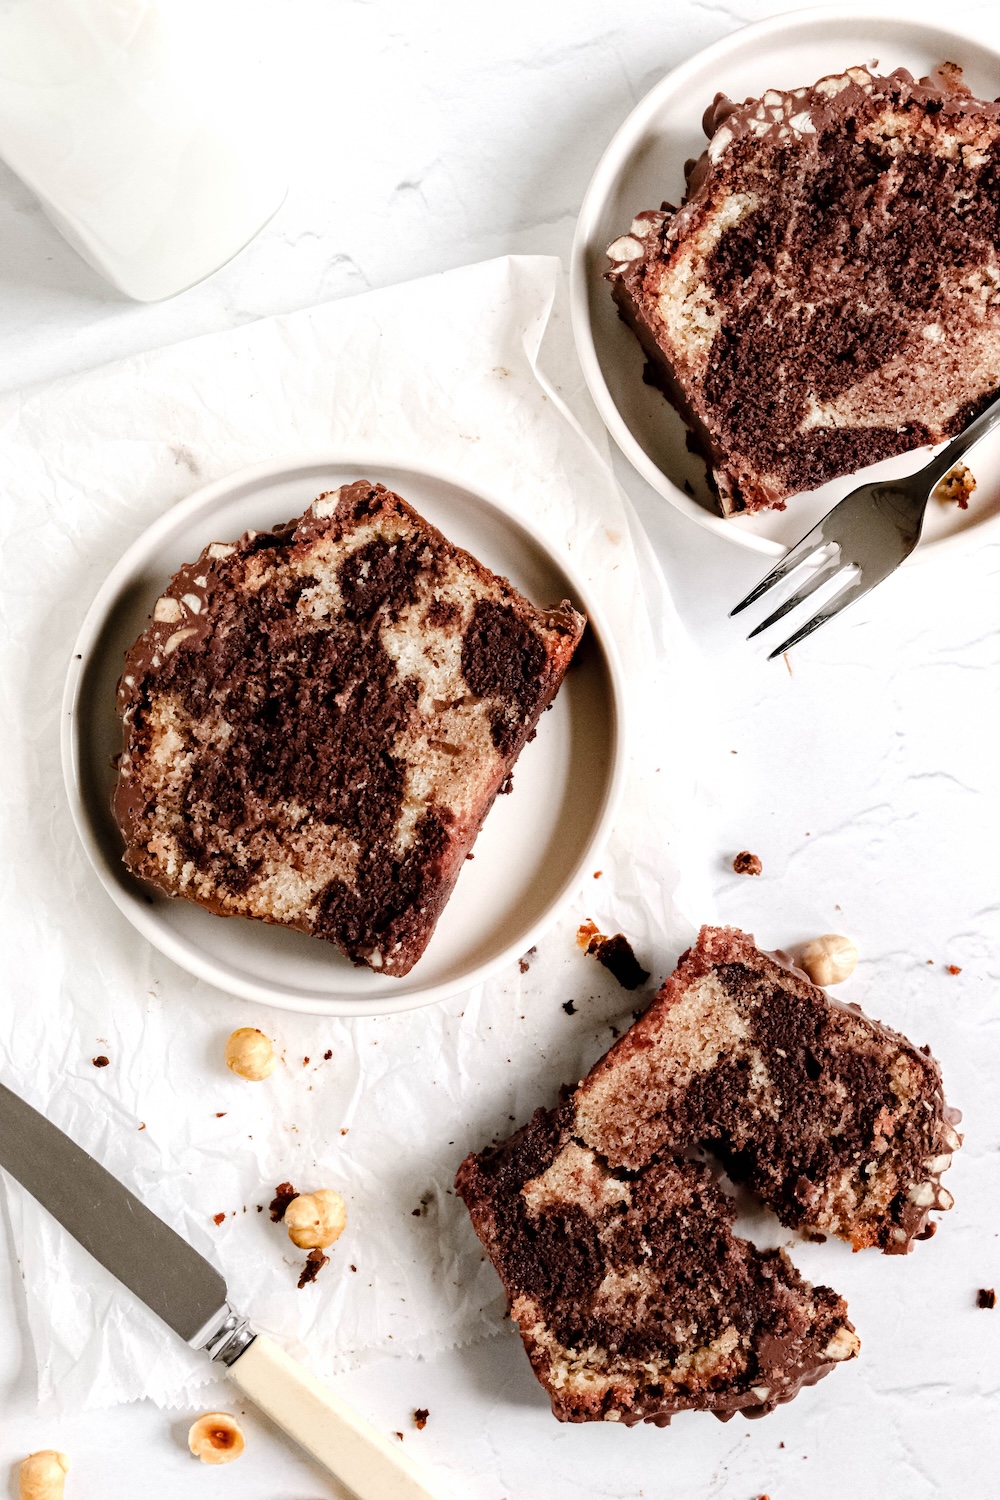
Marble cake is where delicious chocolate batter gets swirled into a buttery vanilla batter and leaves an incredible marble pattern. Coat the whole thing in chocolate with hazelnut chunks and you’ve got yourself Chocolate Hazelnut Marble Cake.

Vanilla pound cake - This delicious Vanilla batter is similar to pound cake and gives you an incredibly moist and dense cake with a tight crumb. The part that makes this cake so easy is that you can use a third of this vanilla batter as a base for your chocolate swirl!

Chocolate cake batter - The chocolate batter gets swirled into the vanilla batter which makes for that amazing marble effect. Simply add some chocolate and cacao for that intense chocolate flavour to your cake batter and get swirling! 

Chocolate Hazelnut coating - A deliciously crunchy and chocolatey jacket for your marble cake, it might be the most amazing addition to this marble cake! It gives it that little crunch and just adds to the overall cake experience

How to make Cannabutter

Making your own cannabutter may sound like a daunting task, but it is actually super easy! It is obviously a MUST addition to this recipe, so it is highly recommended to get a hang of this. Just follow these simple steps and you’ll be good to go:

  1. Begin by decarboxylating your cannabis. Preheat your oven to 110°C, then break the buds into smaller pieces and spread them evenly on a baking tray. Bake for 30–40 minutes, turning the pieces every 10 minutes to ensure even decarboxylation on all sides.
  2. I use a 1,5gr original haze to 180gr butter ratio
  3. Grind your original haze into small pieces or use a pestle and mortar to break it down. Make sure to clean your pestle and mortar thoroughly before and after use
  4. Slowly melt your butter. It is very important not to rush this process as overheating your cannabis will reduce its THC levels
  5. Add your ground cannabis to your butter and on the lowest heat possible, let the cannabis infuse into the butter for 1 hour to make your cannabutter. Make sure the butter does not boil and stir consistently
  6. Leaving the butter on the stove for 1 hour might cause some water to evaporate, meaning you'll end up with less than 180gr of butter, feel free to add some water back into the butter to compensate
  7. Allow the butter to cool and then it's ready to use

The process of making cannabutter involves using heat to fuse the cannabis oils—found in the trichomes—with the fats in the butter. This fusion is more effective when there's greater surface area, as it allows easier access to the cannabis oils. Simply put, more exposed surface area leads to more efficient infusion and a more potent butter.

Calculating your THC levels

Before you start cooking, it’s good to realise that there is a limit to the fun of this cake. This means that you should be careful with how much cannabis you add to your batter. Remember, everybody respons differently to cannabis depending on so many factors (metabolism, weight, tolerance etc.)

Example: If you use 1gr of cannabis with 20% THC you got 200mg THC. If this recipe gives you 10 portions that means you have 20mg THC per slice.

Tips for making Chocolate Hazelnut Marble Cake

I’ll be honest, making your own marble cake can seem like a daunting task, but hear me out when I say that it is totally worth it. Time to scrap those pre-mixed cake boxes and get your bake on, you won’t regret it! 

To make things easier for you, I’ve summarised a few key tips to make the most PERFECT batch of Marble Cake

  • Use good quality vanilla - I can’t stress this enough! Using good quality vanilla makes all the difference in all of your bakes. My personal favourite is always the vanilla paste from Nielsen Massey and my second favourite is the Vanilla Extract from De Notenshop
  • Line your pan with parchment paper -  there’s nothing worse than having your cake stuck to a pan so make sure you line it properly. I always like to have some of the paper sticking out the sides so you can use this to lift it out of its tin after baking
  • Make sure all your ingredients are at room temperature - This will ensure that all your ingredients blend together nicely
  • Do not over- swirl your batter - You want to see that difference between light and dark and not have it turn into one brown batter, so don’t overdo that swirl!
  • Create a platform for your cake -  so the chocolate coating can drip down easily, making a little less of a mess! 


Ingredients of a Chocolate Hazelnut Marble Cake

Because you’ve probably looked at this recipe and thought, I NEED THIS, let me help you out by creating an ingredient list for you. Here’s what you’ll need:

  • Self-raising flour 
  • Eggs
  • Sugar
  • Vanilla
  • Buttermilk
  • Cacao powder
  • Dark Chocolate
  • Hazelnuts
  • Milk Chocolate


Baking time and oven temperature

Baking time and oven temperature may vary depending on the oven you are using.  All oven temperatures are based on a conventional oven. If you bake with a fan assisted oven, turn down the temperature slightly as these ovens tend to become hotter than a conventional oven at that temperature setting. Ovens have the tendency to deviate from the temperature you set the oven to. I would highly recommend using an oven thermometer to ensure the inside of your oven is at the right temperature.

An oven that is too hot may result in an overbaked or burnt bake, an oven that is too cold may result in underbaked and soggy bakes. Having the thermometer will not only help in getting the right temperature but also help in determining the right baking time. 

Other factors that may affect baking time

The size of your baking dish may also highly affect your baking time. A wider pan means that the batter spreads out more, resulting in it baking faster than in a smaller pan where the batter is thicker in height. For this cake, I used a 25x11x7cm loaf pan.

Enjoy loves!

Cannabis Infused Marble Cake

Who doesn't love a good thick slice of marble cake? And it’s even better when it's coated in a hazelnut-chocolate layer🍫⁠

Author:

Demi Bruggink

Prep:

10

min

cook:

70

min

total:

80

min

Yield:

10

Portions

Ingredients

  • 225gr self-raising flour
  • 125gr cannabutter
  • 220gr granulated sugar
  • 1tbsp vanilla 
  • 3 large eggs
  • 160ml buttermilk
  • 100gr melted dark chocolate
  • 60ml extra buttermilk
  • 1tbsp cacao (10gr)

Chocolate Coating (optional)

  • 200gr milk chocolate
  • 50gr finely chopped hazelnuts

Instructions

  1. Preheat your oven to 170C and butter and line your loaf pan 
  2. In a large mixing bowl, whisk together your melted cannabutter, sugar & vanilla
  3. Add in your eggs and whisk till combined, then add your buttermilk and whisk once more.
  4. Lastly, switch over to a spatula and fold in your self-raising flour until you have a smooth batter
  5. Take ⅓ of your vanilla batter and place this in a separate bowl. To this part, add the other 60ml of buttermilk, melted chocolate and cacao powder. Whisk again until you have a smooth batter
  6. Optionally - place both batters in their own piping bag. I like using a piping bag to get the batter into the tin, but you can also scoop your batter while alternating your layers
  7. When all layers are added, briefly swirl the batter with a knife or skewer until you are satisfied. Be careful not to over-mix 
  8. Bake for 60-70 minutes or until the top of the cake springs back when lightly touching it and a toothpick comes out clean. Let it cool completely
  9. Melt your milk chocolate and add your chopped hazelnuts. Give this a mix until fully combined
  10. Take e.g. an oven dish that is larger than your cake, place 2-3 mugs or glasses of equal hights, upside down in the (oven) dish. 
  11. Place the cake on top of the mugs or glasses and pour over your chocolate hazelnut mixture until the whole cake is coated. The dish on the bottom should catch all the chocolate that is dripping off the sides, so it doesn’t mess up your whole kitchen. 
  12. Once the chocolate has set completely you can slice your cake and enjoy!
Thanks for contributing to our community! Your comment will appear shortly.
Oops! Something went wrong while submitting the form.
Be the first to comment on this recipe